Summary
According to market data, in 2024 the Brazilian contactless biometrics market (which includes facial and vocal biometrics) moved US$ 370.1 million, and the expectation is that it will exceed the US$ 1 billion mark in 2030, with a Compound Annual Growth Rate (CAGR) of approximately 18.5%.
Facial biometrics (also known as Facial Recognition), specifically, offers advantages that explain its growing adoption. One of the main ones is enhanced security: by using unique biometric data, it hinders fraud and unauthorized access. In addition, it provides agility and convenience, eliminating the need for passwords, cards, or physical contact, accelerating authentication processes and reducing queues in high-traffic environments.
Another benefit is the reduction of losses and fraud, especially in sectors such as finance, where it prevents the misuse of identities, while in corporate environments it prevents unauthorized people from accessing sensitive areas.
Scalability and flexibility are also relevant differentials. The technology can be implemented in different environments, from small businesses to large corporations, and integrated with other security systems, such as smart cameras, motion sensors, and management software. It is highly adaptable, being usable on both mobile devices and fixed systems.
In this article, we will demonstrate step-by-step how simple and quick it is to implement, using our AIOS platform, an AI-based facial recognition access control solution that offers benefits such as continuous and autonomous monitoring, high precision, and automated alerts.
To follow this tutorial, you will need access to AIOS and an AIBox, as well as an IP video source (an RTSP stream) that can be connected to the platform and shows the scene to be monitored. However, even without system access, you will quickly understand the ease of use and flexibility of our software.
Working With Collections
First of all, to implement a facial recognition solution in AIOS, we need to create a Collection. It is nothing more than a set of data (such as previously registered faces) that can be stored on the platform for later use. Components such as Facial Recognition can compare detected faces with those stored in a collection, automating actions such as granting access or sending security notifications, among other uses.
For example, imagine we are implementing an access control solution for a condominium. When a person approaches a camera, we want the system to detect the face and compare it with those previously registered, granting access if the face belongs to the set or alerting an employee otherwise.
For this, we need to create a collection with the faces of all residents. On the AIOS home screen, click on the Collections item in the left sidebar menu (the third item, from top to bottom), and on the Create collection / + Faces Collection button in the upper right corner of the screen.
In the window that appears, define a name in Collection Name (e.g.: Condominium Residents) and optionally a description for the collection in Collection Description (e.g.: Residents of Hermeto Paschoal Condominium). Click the Create button.

You will be taken back to the collections module home screen, and a new card will be created for your collection. Our collection is ready, but empty. Now we need to edit it to add records.

To add a record to a collection, click on the card that represents it on the Collections screen, and on the Add register button in the upper right corner of the screen. In the window that appears, click on Face Images to upload an image of the face you want to add to the collection.
We recommend that images have a maximum resolution of 1,280 × 720 pixels, and a maximum file size of 1 MB. For best results, the face should be centered in the photo, well-lit, and without accessories (such as glasses).
Enter the name that will be associated with the record in the Face Name field and click the Register button to complete the process. Repeat for all other faces you wish to add to the collection.
It is possible to add more than one face to a record, increasing detection accuracy. Records can also be renamed or deleted. To learn more, consult the AIOS documentation.

Pipelines and Components
Now we will work on the detection itself. AIOS uses the concepts of Components and Pipelines. A component performs a simple task, such as receiving video from a camera, detecting an object, counting the number of times an event occurs, or identifying changes in an image area. A pipeline is the name given to a set of interconnected components that capture and process the image for a specific objective.
All work in AIOS occurs in a pipeline. Therefore, we need to create one. In the AIOS interface, select the Pipelines item (the second from top to bottom) in the toolbar on the left side of the screen, and then click on the +Add Pipeline button, in the upper right corner.

In the window that appears, in the Pipeline Name field, indicate a descriptive name (e.g.: “Access Control”) for your pipeline, and in Device choose the device (AIBox) where the pipeline will be created. Click the Create pipeline button.
The next screen shows a preview of your pipeline and the results. As the pipeline has just been created, both areas are empty. Click the Edit button at the top of the screen to start building your pipeline.
Receiving Video
The first component we will use is the Video Feed. This is the fundamental component of every pipeline in AIOS, and indicates the video source we will use for detection. Just click on the component in the list on the right side of the screen and in an empty space in the workspace to position it.
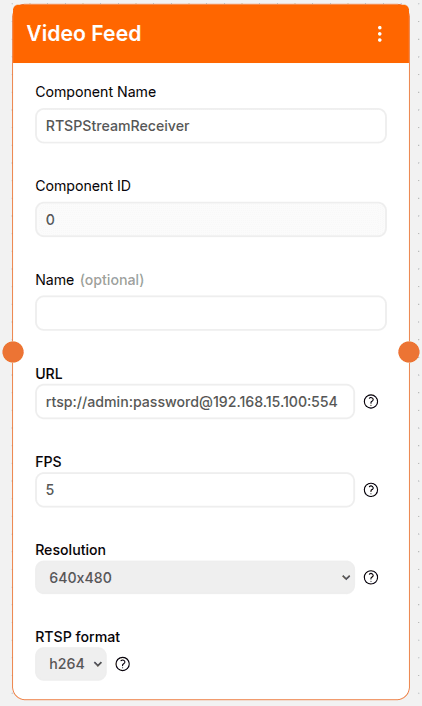
We need to configure some Video Feed parameters. Name is optional, and serves to identify the component, for example “Reception_Camera”. URL is the URL of the camera’s video stream that will be used for detection. For example, rtsp://admin:password@192.168.15.100:554.
In this URL, the parameters admin and password are, respectively, the username and password required to access the stream. After the @ we have the camera’s IP address (in the example, 192.168.15.100) and port (554). It is worth remembering that the parameters shown here are just an example, you must fill in the actual values corresponding to your camera.
In FPS you must inform how many frames per second (Framerate) will be processed during detection, between 1 and 10. The higher the number of frames per second, the greater the processing demand on your AIBox. Most solutions, including facial recognition, do not demand a high framerate, so we can use the default value, 5.
We will not need to modify any other parameters now. The Video Feed component will look like this:

Identifying Faces
AIOS has two components dedicated to facial biometrics. Facial Recognition performs local recognition, meaning no image leaves the AIBox. This makes it the best option for cases where greater privacy and low latency are needed. Its use is recommended for small-scale applications, with up to 300 registered faces.
Facial Recognition 2.0, on the other hand, performs remote detection in the cloud. For this, a small portion of the image, containing only the face to be recognized, is sent to the server and discarded after detection. This component uses a more robust recognition algorithm, making it suitable for situations where greater detection accuracy is required.
For our example, Facial Recognition is sufficient. Click on the component in the list on the right side of the screen and in an empty space in the workspace to position it below Video Feed.
Note that on the bottom edge of the Video Feed component there is a small orange circle. This circle is also present on the top edge of the Facial Recognition component. To connect the components, simply click on the circle on the bottom edge of Video Feed and drag the mouse to the circle on the top edge of People Detector. A dotted line will appear, demonstrating the connection between them.

The only field of the Facial Recognition component we need to worry about is Face Collections, where we will indicate which collection will be used for comparison. In our case, the Condominium Residents collection we created earlier.
The parameters Similarity Threshold, Eye Distance Threshold, Eye Angle Threshold, and Frequency Threshold can be used for fine-tuning the detection, but usually do not need to be modified. Consult the component documentation to learn more.
Generating Alerts
AIOS can be configured to take a huge variety of actions based on detection results, such as sending alerts via WhatsApp, Email, or Kanban, integration with monitoring software like Moni or with industrial equipment via PLCs (Programmable Logic Controllers). It is even possible to develop customized solutions, using our API to integrate detection results with your internal systems.
In our example, we will generate two simple WhatsApp alerts, one when a resident is detected, and another that will be sent in case of an unknown visitor. Note that this is just an example. With the same ease, you could activate a PLC to enable a turnstile when a resident is detected or sound an alarm at the gate in case of an unknown person.
Position a WhatsApp component below Facial Recognition and connect the components as previously shown. The WhatsApp parameters are simple: Phone Number is the number that will receive the message. It must be in the format +COUNTRYCODE_AREACODE_NUMBER. For example, to send a message to a São Paulo phone with the number 12345 6789, we use +55 (Brazil’s Country Code), 11 (São Paulo’s Area Code) and the number, i.e.: +5511123456789.
In the Custom Message field, type the text of the message to be sent. Here we will alert when a resident is recognized, so the message will be “Resident found”. Set the Send Image parameter to True so that the alert also includes an image of the detected face.
The Time between Notifications parameter, specified in seconds, prevents successive notifications from being sent in a short period, avoiding what is known as an “alert flood”.
Imagine it is set to 10 seconds. This means that as soon as a person enters the demarcated area, an alert will be sent. New alerts will only be sent if the person remains in the demarcated area after 10 seconds from the previous alert.
The last parameter is Face Notification. Basically, it establishes that a message will be generated if the detected face belongs to the indicated collection, Condominium Residents. Otherwise, no alert will be generated.
To generate an alert in case of unknown faces, add a second WhatsApp component next to the first, and also connect it to Facial Recognition, as shown below.

Configure it like the first component: add a phone number (which can be different from the previous one), a message (Ex: “Visitor at the reception desk!”), set Send image to True and the desired Time between notifications. The difference is in the Face Notification parameter: instead of selecting a collection, select the Unknown option, which will generate a notification in case of unknown faces.
Testing The Pipeline
Our facial recognition pipeline is ready. Recapping, it will work as follows:
- Obtains video from an IP camera
- Searches for faces in the video using the Facial Recognition component, comparing the faces found with those registered in the Condominium Residents collection.
- If the face is found in the collection, sends a message (“Resident found”) and an image of the found face to a specified WhatsApp number.
- If the face does not belong to the collection, sends a different message (“Visitor at the reception!”) and an image of the found face to a specified WhatsApp number.
To test the results, save your pipeline by clicking the Save button at the top of the screen. You will be taken to the pipeline visualization screen. Execute it by clicking the Play (▶) button at the top of the screen, and wait a few seconds until an image from the camera appears in the preview area.
As faces appear in front of the camera, you will receive messages on the specified phone numbers indicating whether the faces have been recognized or not. To stop the pipeline, click the Stop (⏹) button at the top of the screen.

Conclusion
Obviously, this is just a small sample of what can be achieved with AIOS, which stands out as a comprehensive and versatile platform in the field of computer vision and edge AI thanks to its flexibility.
With its ability to serve various sectors — from industry to logistics, from security to smart cities — AIOS offers innovative solutions that transform visual data into actionable insights and tangible results, without the need for technical expertise. Talk to us, and discover how AIOS can accelerate your digital transformation.


