Image by Freepik
Summary
With AIOS, dtLabs’ no-code Edge AI platform, you gain access to a user-friendly environment and a library of ready-to-use models that enable the rapid creation of sophisticated computer vision solutions. This approach significantly reduces implementation costs and time-to-market. How fast? Think “a few minutes.”
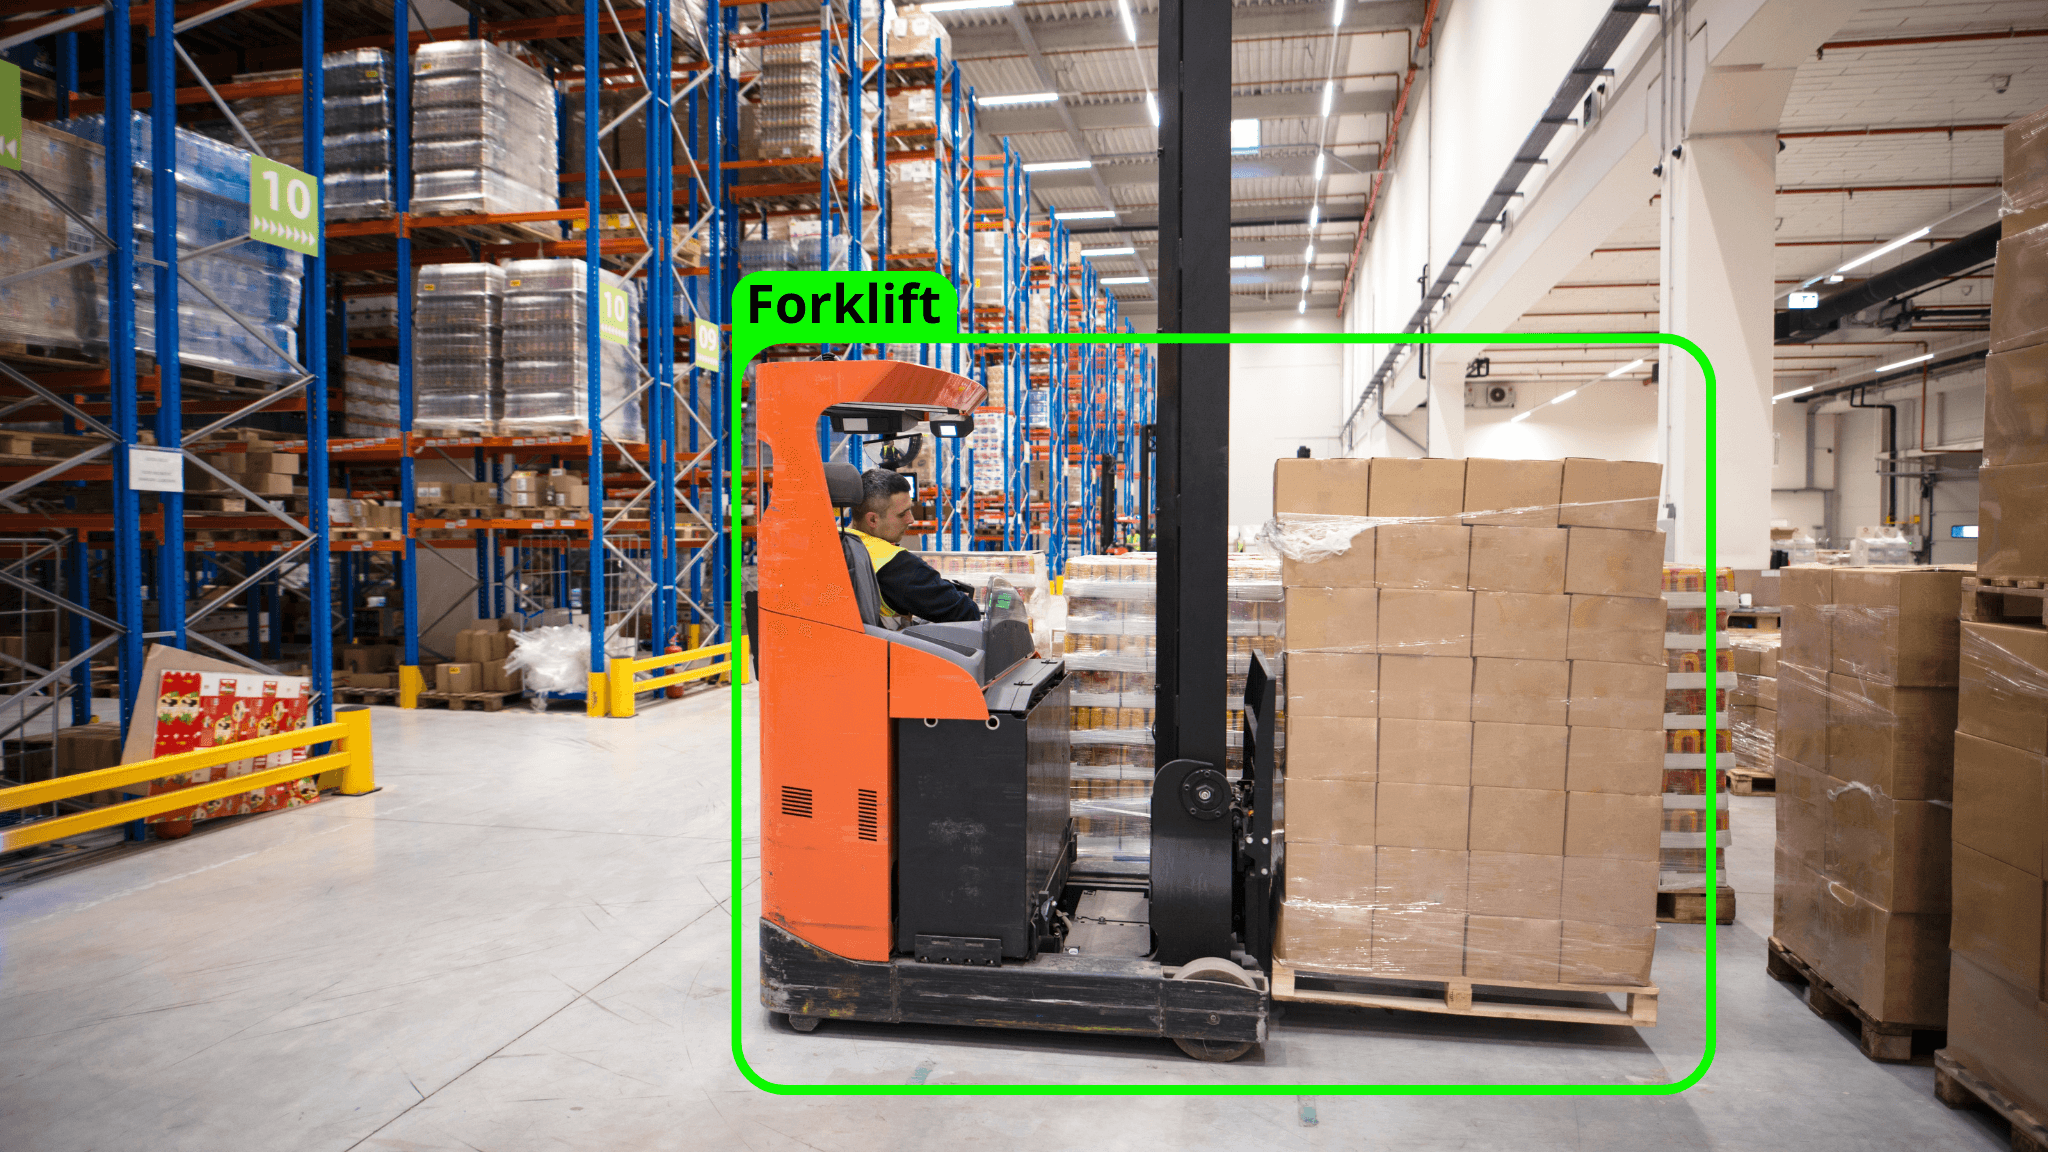
This article provides a step-by-step guide to creating a simple yet impactful solution. Imagine managing a warehouse where both employees and forklifts carrying pallets move around. For safety, you need an alert system—such as emergency lights or a siren—that activates whenever a forklift operates in the area, ensuring workers stay vigilant.
While assigning someone to monitor forklift activity or relying on drivers to manually trigger alarms is an option, these methods are inefficient and prone to human error. The solution? Automation.
By combining AIOS components like Object Detection and Detection in Polygon, you can automate this process with 24/7 precision—all without writing a single line of code. The key is creating a “pipeline,” a sequence of interconnected actions.
To follow this tutorial, you’ll need access to AIOS, an AIBox device, and an IP video source (e.g., an RTSP stream) connected to the platform. Even if you don’t have access, you’ll quickly grasp how intuitive and flexible the system is. If you’re new to AIOS, reach out to the dtLabs team for a demo!
Detecting an Object
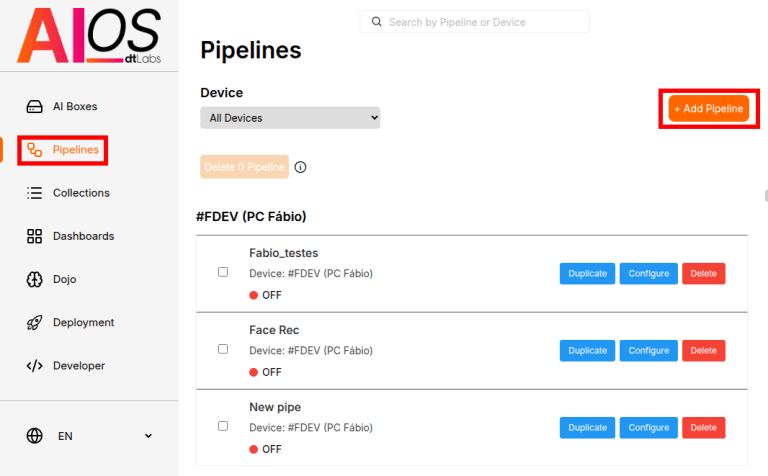
In the AIOS interface, select the Pipelines item from the toolbar on the left side of the screen, then click the +Add Pipeline button in the upper-right corner.
In the next window, enter a name for your pipeline, select the device (AI Box) where it will be created, and click Create pipeline. You’ll then be taken to the preview screen, which shows an overview of your pipeline on the left and a detection preview on the right. Since your pipeline is currently empty, these fields will be empty as well. Click Edit to open the pipeline editor.
Let’s take a moment to get familiar with the editor interface. The large empty area below your pipeline’s name is the workspace, where you’ll place the components that make up your pipeline. On the right side, you’ll find a list of available components, and above it, a search bar that lets you find components by name.
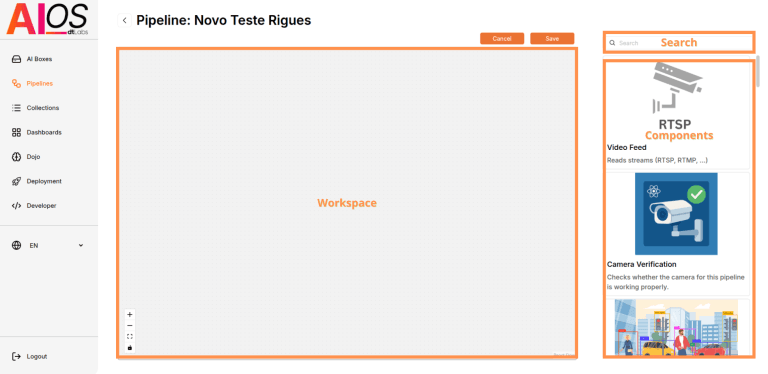
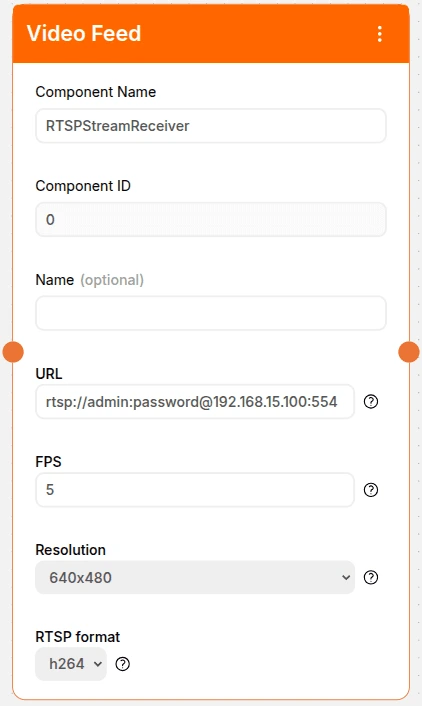
The first component we’ll use is Video Feed, a key element of any AIOS pipeline. This component defines the video source for detection and its associated parameters. Simply drag it from the list on the right to an empty spot in the workspace.
The Video Feed component requires some configuration. In URL you will enter the video stream URL of your camera in this format: rtsp://admin:password@192.168.15.100:554, replacing admin and password with your camera’s username and password. After @, input your camera’s IP address (in this example, 192.168.15.100) and port (554). Note: These values are examples; use your camera’s actual credentials.
In FPS (Frames Per Second) you should specify how many frames per second will be processed during detection (between 1 and 10). For dynamic scenes like this one, where quick response times are critical, a higher value is recommended—set it to 10.
Lastly, In RTSP-format you should indicate the codec used by your camera for video streaming, such as h264. No additional changes are needed for now. Once configured, your Video Feed component should look like this:
Now let’s add another component to our pipeline, called Object Detection. Drag and position it to the right of the Video Feed box in the workspace.
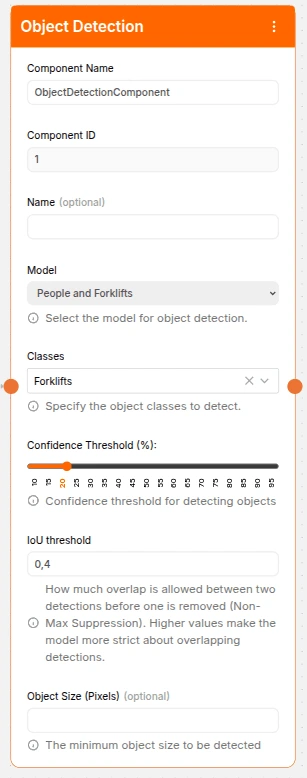
The Object Detection component has two parameters that need to be configured: the model we’ll use and the objects (Classes) we want to detect. For this tutorial, we’ll use a prebuilt model capable of detecting both people and forklifts. Simply click on the first dropdown menu and select the option People and Forklifts.
In the Classes menu, specify what you want to detect. For this example, we’ll focus only on forklifts, so select the option Forklifts. Once configured, your Object Detection component should look like this:
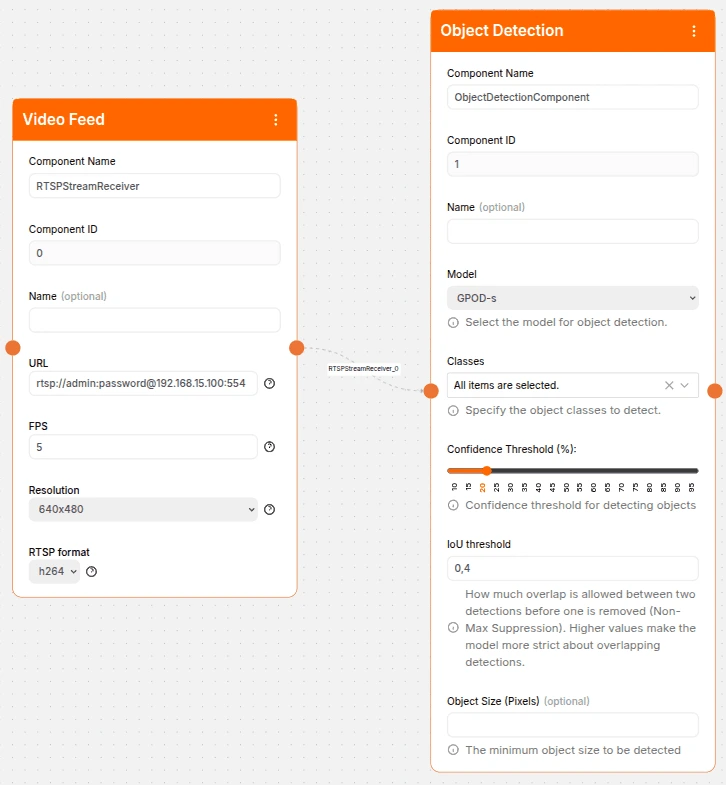
One important step remains before we can see practical results from our pipeline. Currently, we have a video source and an object detection component, but there’s no connection between them. A connection is essential to define the flow of data—who sends and who receives. In a pipeline, the flow moves from left to right in the workspace.
Notice the orange circles at the left and right edges of the Video Feed component. Those same circles are present at the left and right edges of the Object Detection component. To connect these components, click on the circle at the right of Video Feed and drag your mouse to the circle at the left of Object Detection. A dotted line will appear, visually representing the connection between them.
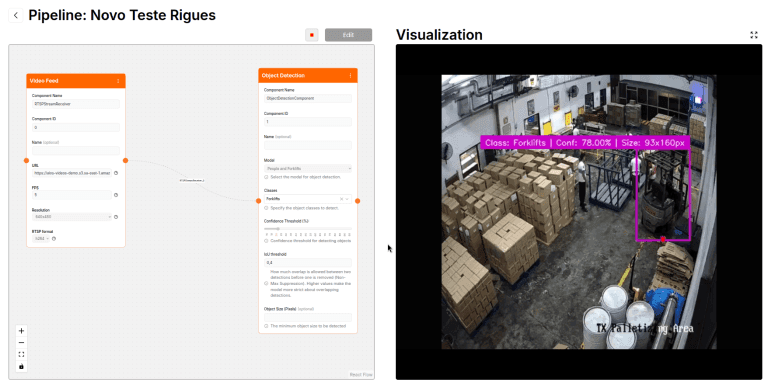
The result will look like this:
With this, we now have the basics to detect the presence of forklifts in a scene. Click the Save button at the top right of the page. The next screen will display:
- On the left, an overview of your pipeline.
- On the right, a visualization of the results.
To preview your pipeline, click the Play button (the triangle icon) at the top of the screen, next to the Edit button. You’ll see the camera feed selected in Video Feed, and if a forklift appears in the scene, it will be clearly highlighted with a bounding box.
But we don’t just want to detect the presence of forklifts—we want to detect them in a specific area and make decisions based on the detection results. To achieve this, let’s edit our pipeline. Stop the preview by clicking the Stop button at the top of the screen, then click Edit to return to the editor.
Defining an Area
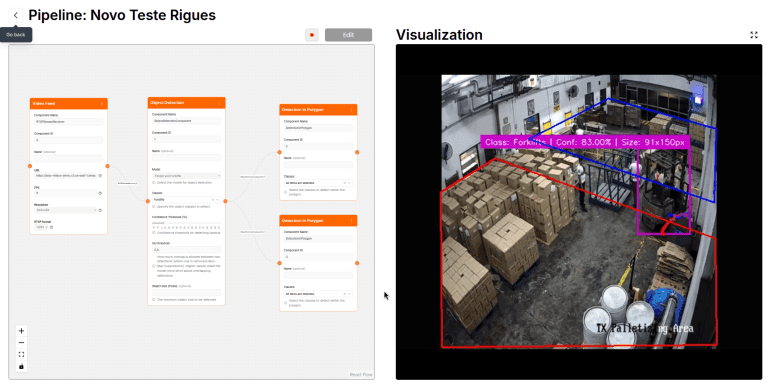
To identify an object within a specific area, we’ll use a component called Detection in Polygon, which is simple to use: all you need to do is, using your mouse, mark the area on the image where you want detection to occur.
Drag the Detection in Polygon component into the workspace and position it to the right of Object Detection. Connect both components as you did earlier.
Click the pencil icon on Detection in Polygon, and a window will appear showing a single frame from your video source. To define the detection area, use your mouse to click on the corners (vertices) of the desired area, creating a translucent polygon on the screen. If the shape isn’t perfect, don’t worry—you can use the mouse and drag the vertices to adjust and refine the polygon.

If desired, you can define multiple detection areas. Simply add a Detection in Polygon component for each area and mark them individually. Don’t forget to connect each component to the Object Detection module.
Save your pipeline and click Play to preview the execution. If everything worked correctly, the edges of the detection area will turn red whenever a forklift enters the marked zone, confirming a successful detection.
Triggering an Action Based on Detection
Our pipeline is nearly complete. We can already detect forklifts and determine when they enter a specific warehouse area. Now, we just need to define the action to take when a detection occurs. As you might expect, there’s a component for that!
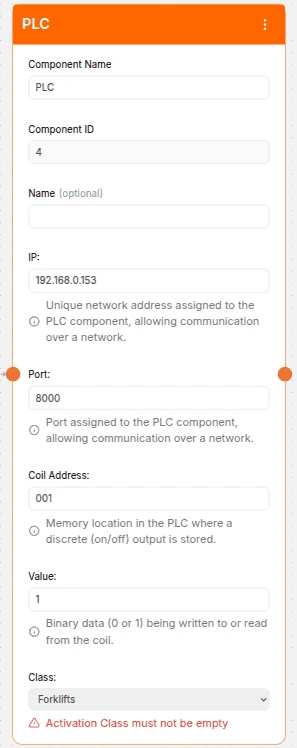
This component is called PLC, named after the Programmable Logic Controller, a common piece of industrial automation equipment used to control connected devices. These devices interact with ports called “coils,” which receive logical signals. For example, a 1 signal might activate equipment connected to a coil (e.g., triggering an alarm), while 0 turns it off.
Suppose an alarm is connected to Coil 1 of a PLC. To activate it when a forklift enters a detection zone, all we need to do is drag the PLC component into your pipeline and connect it to the Detection in Polygon component.
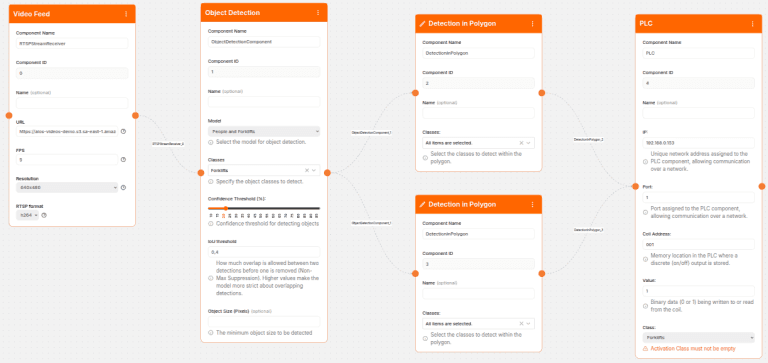
The PLC setup is straightforward:
- IP and Port: Here we specify the PLC’s IP address and port you want to control.
- Coil: Enter the address of the coil connected to your equipment (e.g., 0001 for our example).
- Value: Set the signal sent to the coil when detection occurs—use 1 to activate the siren.
- Class: Select the object that triggers this action. Since we’re detecting forklifts, choose Forklifts from the dropdown.
Note: If you have multiple detection zones, you can connect different PLCs to each and customize actions. For example, you can trigger an alarm when a forklift crosses the warehouse entrance, but ignore detections at the exit. Here’s the final configuration:
You’re all set! Simply save your pipeline and run it. In just minutes, you’ve built a sophisticated AI solution that includes multi-object detection, decision-making, and integration with real-world equipment. Pretty cool, right?
Conclusion
Of course, forklifts aren’t the only thing you can detect with AIOS. The platform enables you to:
- Monitor PPE (Personal Protective Equipment) compliance among employees.
- Detect intrusions in restricted areas.
- Calculate object volumes (Volumetry).
- Perform quality control on production lines.
- Identify fire and smoke hazards.
- Manage parking space occupancy.
And much more—it’s impossible to list every possibility in a single article.
AIOS’s flexibility sets it apart as a comprehensive, versatile platform in the fields of computer vision and Edge AI. Capable of serving diverse industries—from manufacturing to logistics, security to smart cities—AIOS delivers innovative solutions that turn visual data into actionable insights and tangible outcomes, all without requiring technical expertise.
Count on AIOS to accelerate your digital transformation journey and discover why we have satisfied clients across over 15 countries.